WildeHerb is a collection of wild herb and wildflower sightings.
Edible Plants
Edible plants range from wild raspberries and elderberries to Oswego tea and mustard greens. Plants native to North America are of particular interest.
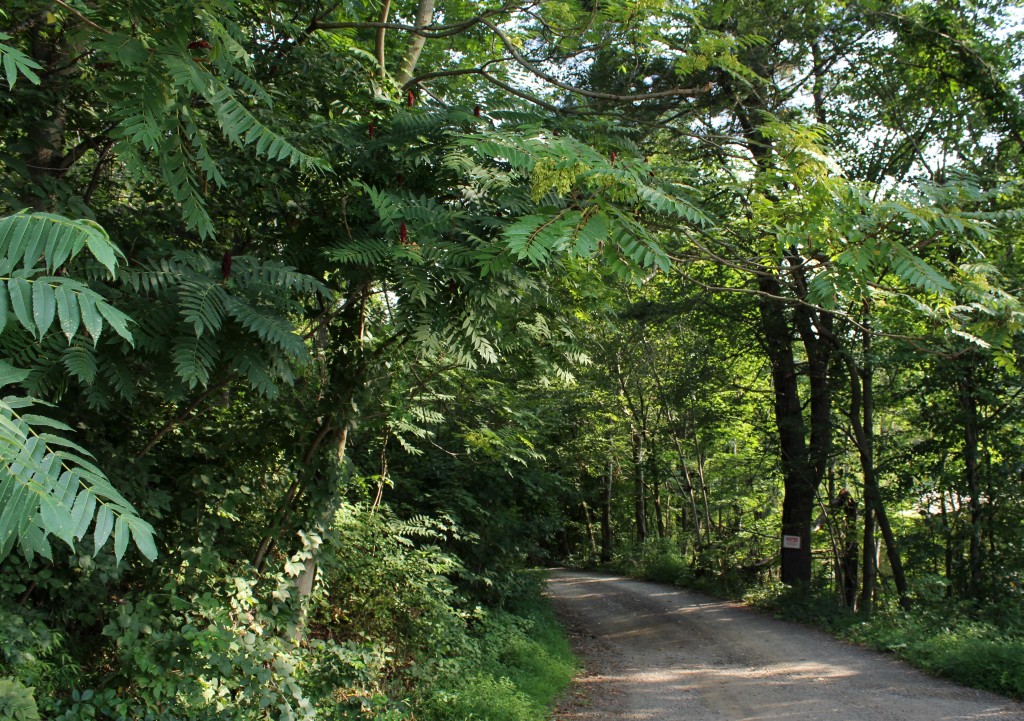
One day I was driving about the countryside taking notice to sumac trees. The Staghorn Sumac has an interesting way that the branches grow up and out and I was curious if that characteristic was seen in other sumacs. Smooth Sumac At the Roadside
Indeed, it would be nice to find one of the other species of sumac I’ve read about in tree books, like Peterson’s Guide to Trees and Shrubs. In Northeastern U.S. we have four species of sumac.
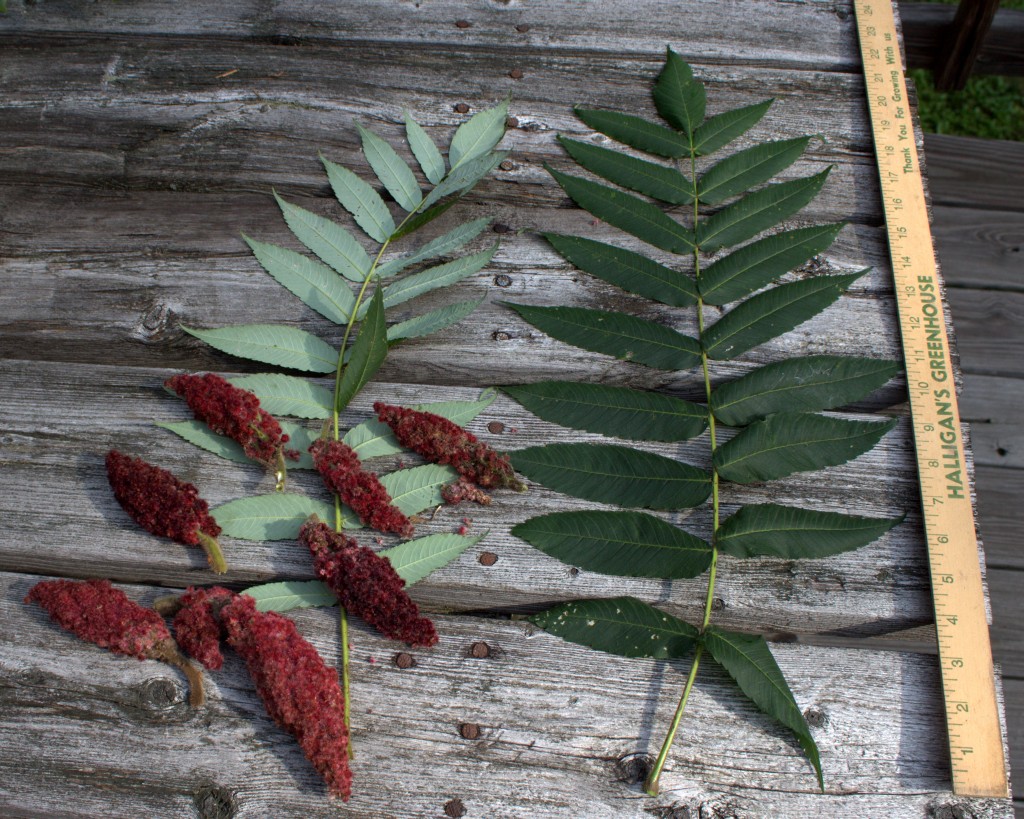
Anyway, this one grouping of sumac seemed smaller than the staghorns we’d been seeing, so I pulled off the road to take a closer look. Compound Leaves and Red Berries of Smooth Sumac
The long, feather-like, compound leaves and the upright bunches of red berries at the end of branches identified the plant as a kind of sumac, other than Poison Sumac.
Distinguishing features of Smooth Sumac, Rhus glabra:
leaflets toothed
red berries in spreading cluster
twigs smooth, almost hairless
Smooth Sumac Berries
In comparison with Staghorn Sumac, R. typhina, the individual red berries of smooth sumac appear more like distinct individual berries without so many hairs.
It may be difficult to see the difference unless berries of both species are available, but clusters of staghorn berries appear to be more densely packed into a cone shape.
Loose Cluster of Smooth Sumac Berries and Huge Compound Leaf
Since the hairs on the outside of the berry provide the malic acid and tartness, the smooth sumac berries are often called “less tart” than their staghorn cousins. So, if you’re going to collect sumac berries try to get staghorn berries as they will provide more of that lemony taste.
Sumacs are some of the deciduous trees that give early indication that autumn is approaching. Their leaves are already turning red as of early August.
You can make a cold drink similar to lemonade and hot drinks like tea.
The berries can be dried and hung in the pantry for future use or ground up and put in a shaker jar for use as flavoring agent in any number of dishes where you normally use lemons or a spice like Lemon Pepper.
Videos Show How People Consume Sumac
..for cold and hot drinks
..for the wood used for making flutes and berries for “lemonade”
..for cracker bread and hot drink
..for lemon flavoring via blender and shaker (@ 8:20)
Lemons, too bad they’re tropical. It would be great to have a lemon tree in the backyard, but you’d have to live in Florida or similar climes for that.
Wouldn’t it be great to find a local alternative for a lemony taste? That way we could always have some “lemon” on hand.
It turns out that the berries of the sumac shrub can be used to add a sour note to our favorite foods.
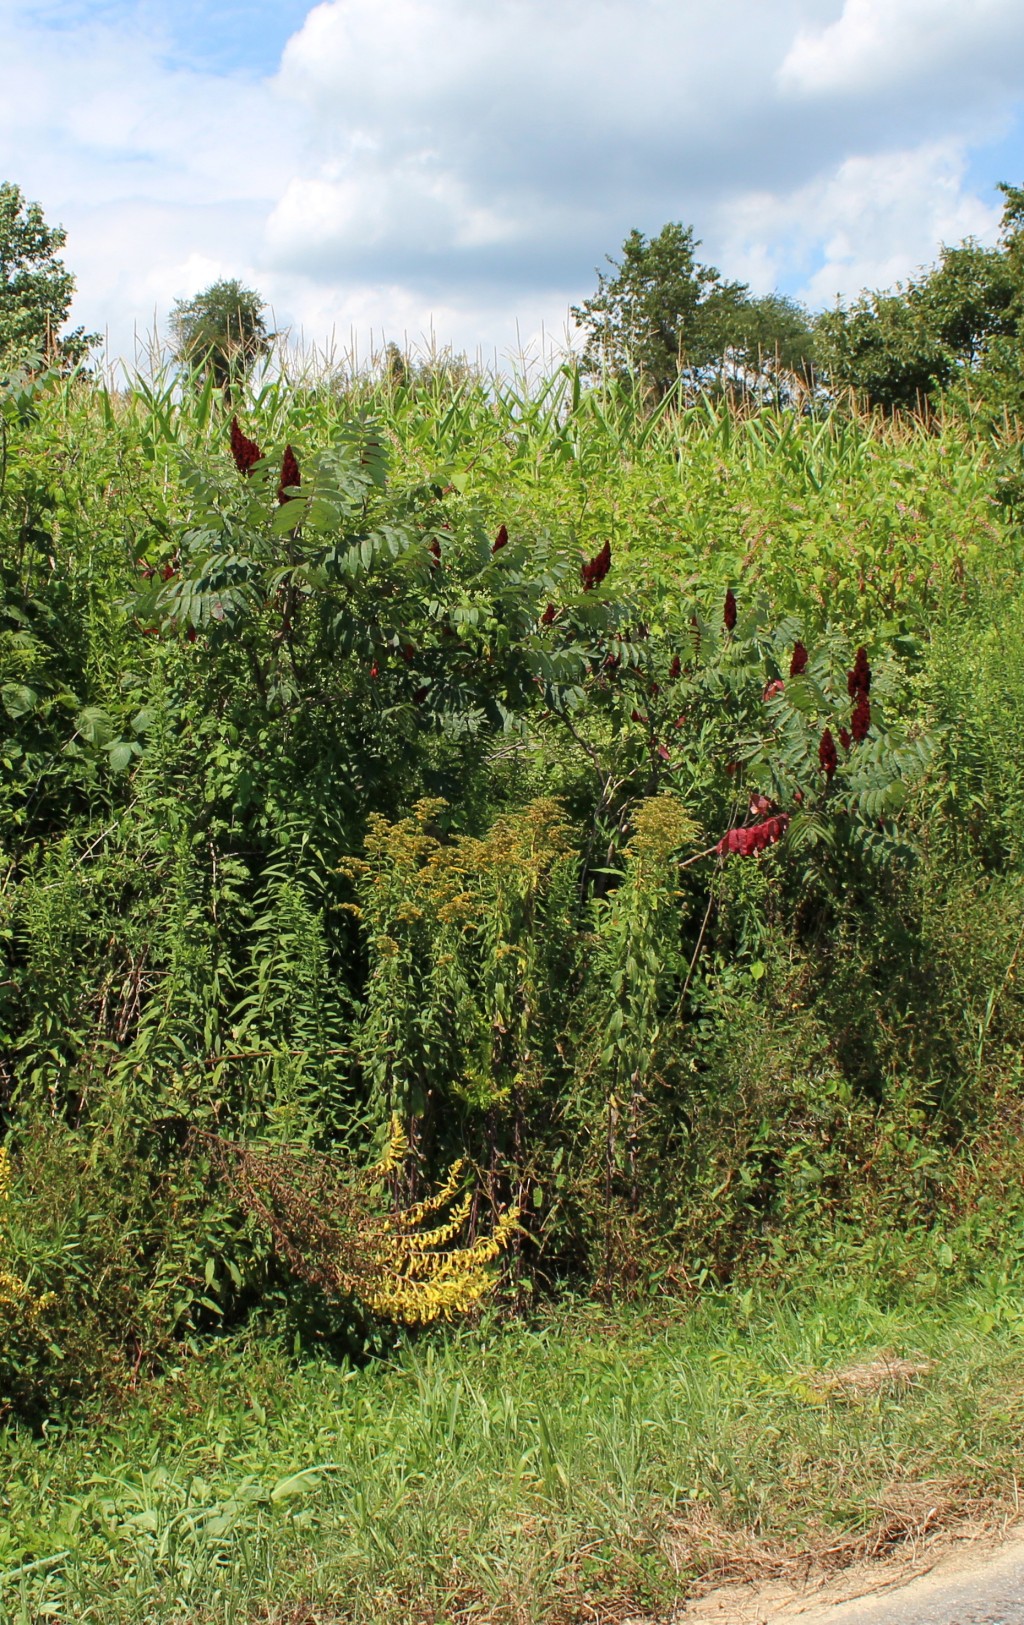
Staghorn Sumac Growing At the Roadside (On Left)
Sumac would be considered a shrub or understory tree. It needs to grow with lots of sunlight so you’ll find in sunny locations like at the edge of roads or fields.
In Eastern USA there are several different species of sumac. One that we have in abundance here in Central PA is Staghorn Sumac, Rhus typhina. Staghorn Sumac Growing In A Sunny Spot
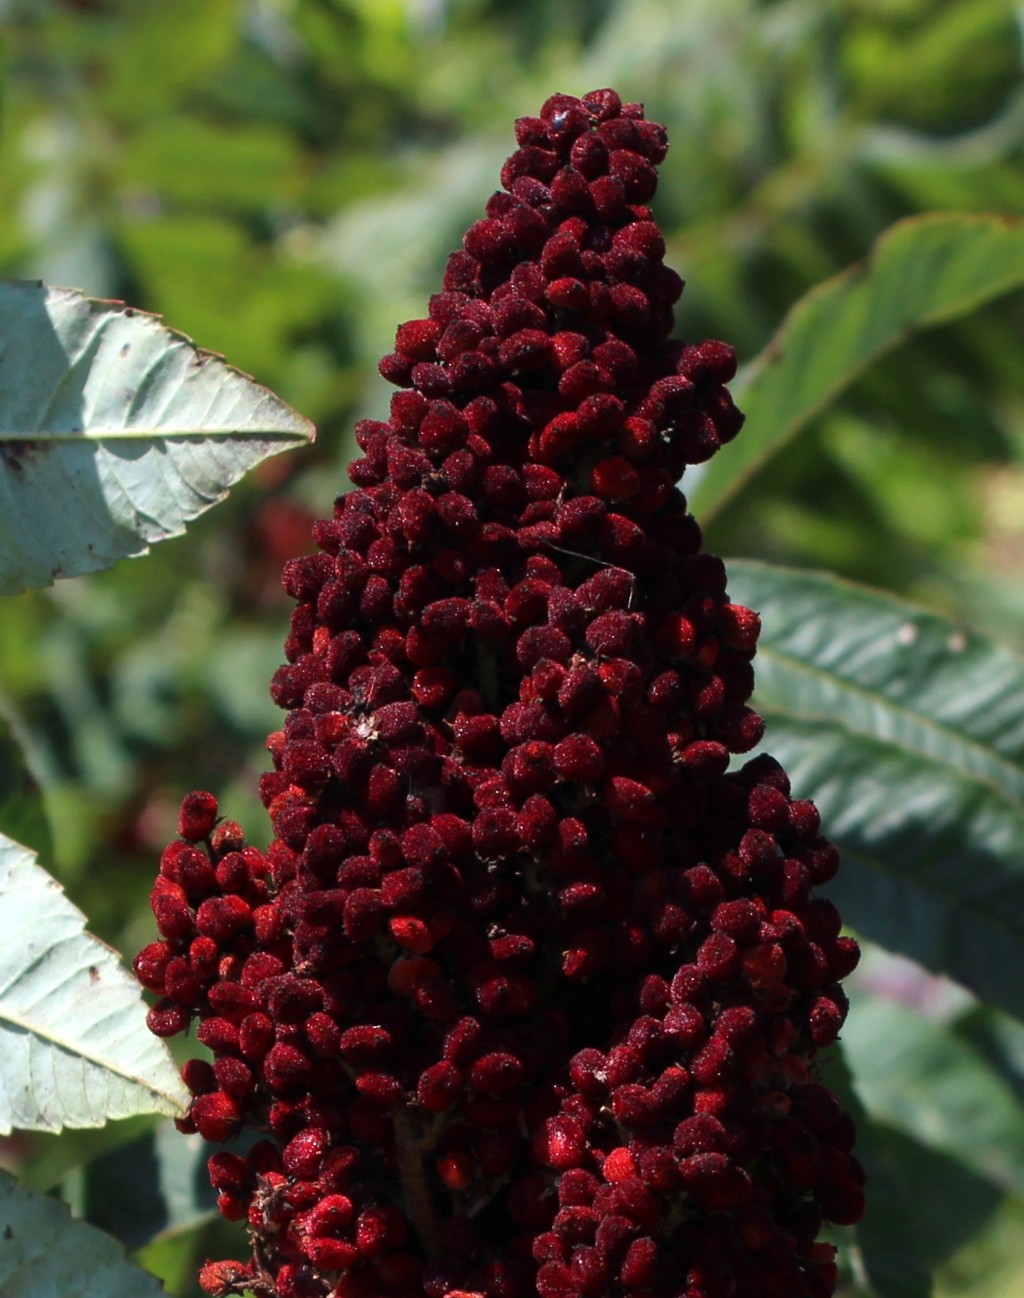
Staghorn Sumac is the most common sumac that grows in Northeastern USA. The fruits of this deciduous shrub are cone-shaped clusters of fuzzy red berries.
The “staghorn” name comes from the velvet-like surface of branches, a helpful identifying characteristic. Velvet Twigs of Staghorn Sumac
Red Sumac Berry Clusters At Branch Tips
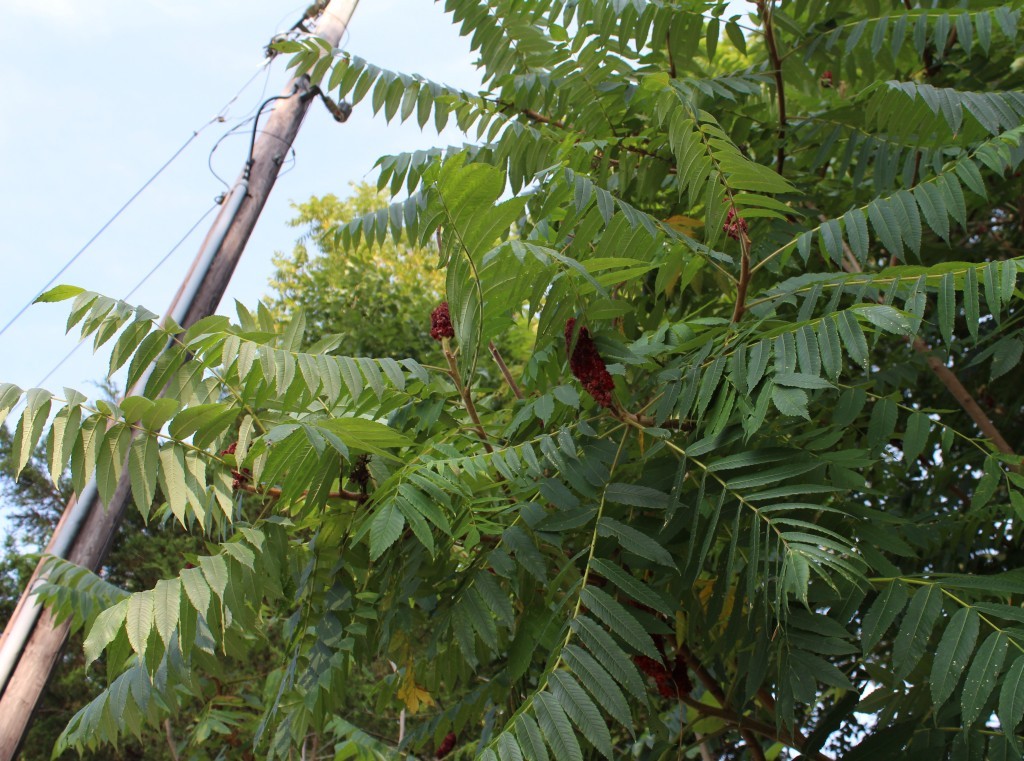
The fruit cluster at end of branch is held above giant compound leaves that can stretch out to two feet long.
The berries are edible and used as a spice or flavoring agent.
Once you mention sumac though, some folks think poison right away. That’s because there is a totally separate plant called Poison Sumac.
Obviously, we don’t want to eat that one, but its berries are white and not likely to get mixed up with the edible red sumac berries.
Also, Poison Sumac grows in swampy areas, not in the upland and agricultural areas where you’ll find Staghorn Sumac.
Identifying characteristics for Staghorn Sumac:
pinnately compound leaves
lance-shaped leaflets strongly toothed
leaflets without stems, sessile
twig bark with velvet-like surface of long hairs
small round fruits held in upright cone-shaped cluster at the ends of branches
individual fruits fuzzy or hairy and red when mature
Giant Compound Leaves and Red Fruit Clusters of Staghorn Sumac
If the plant you’ve found has all of those characters, you’re good to go. Check the photos and a field book, like Newcomb’s Wildflower Book, if you’re still not sure.
Use a sharp knife to remove the cluster of berries from the branch or grasp firmly and break off the cluster with your hand.
Put the fruit clusters into a paper sack so that any of the little fruits that get knocked off aren’t lost.
Go collecting on a day in July or August when it hasn’t rained for at least three days. You want the little fruits to be dry.
Rain washes off or dilutes the lemony taste.
To find sumac look at the edges of fields, along roads and right-of-ways, and in other areas where the ground has been disturbed.
Sumac likes to grow at the edges of forests and fields. When the foliage is starting to turn colors in autumn the sumac shrubs will be easy to find as their leaves turn a bright, bright red. Staghorn Sumac Red Fruit Clusters
Autumn is too late for collecting these berries, but you can locate the plants then for collection in future years.
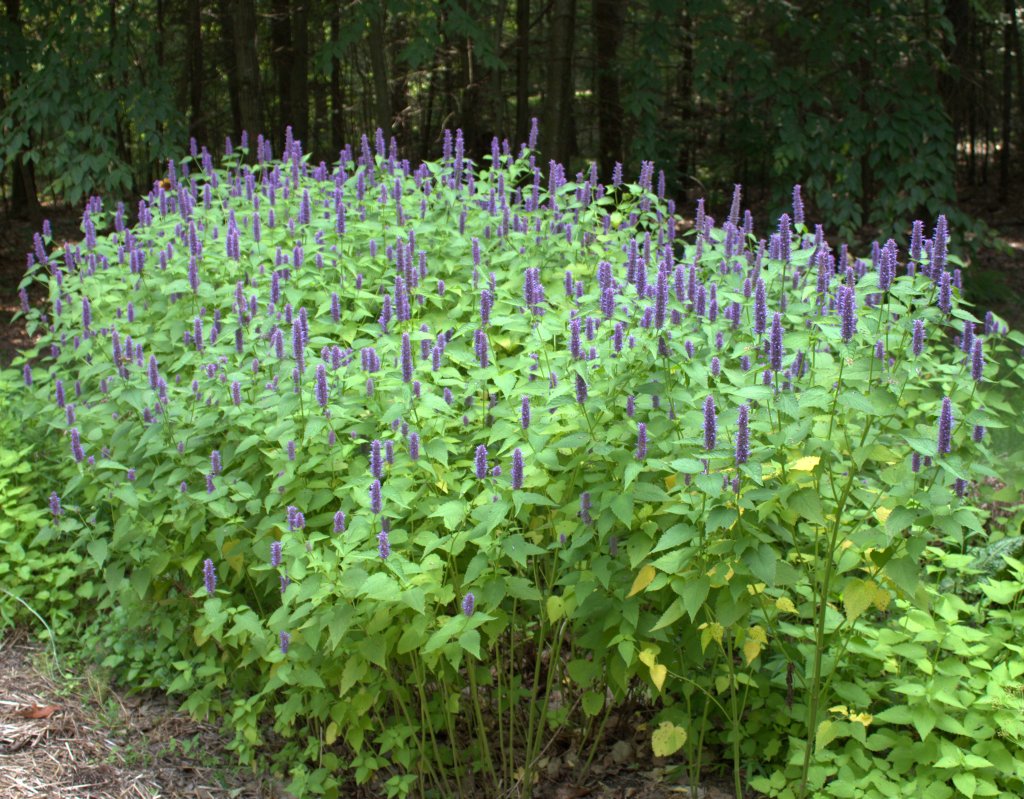
Anise Hyssop or Giant Blue Hyssop has been blooming at the edge of our garden for a couple of weeks now.
This purple-flowering plant is native to the American plains, but we have found out that it grows quite well in the Appalachian Mountains of Pennsylvania.
The blooms are pretty spikes of purple that grow longer as the plant blooms for a few weeks time. That’s a nice thing about anise hyssop in that the blooms are long lasting.
Anise Hyssop in full bloom will attract bees and butterflies.
Bees and butterflies are attracted to the flowers like crazy. Standing near the hyssop one can hear the buzzing of the bees that visit constantly. We’ve seen several kinds of butterflies and hummingbirds visit the blossoms as well.
The leaves smell of anise and can be used to make a tasty tea that is sweet enough to not require sugar or honey!
All-in-all Anise Hyssop, Agastache foeniculum, is one nice garden plant because it attracts pollinators, provides beautiful flowers to look at and leaves for tea, and it’s a perennial too!
When you don’t use herbicides to kill “weeds” in your lawn, you never know what might come up. I enjoy knowing that we don’t add to the pollution that kills by indiscriminate spraying of nasty chemicals.
I also enjoy the surprise of finding new and interesting plants – and insects – that show up unannounced.
Heal All is one such plant. It appears in various places in the yard and since it can be used for a healing tea, I say, “Let it grow!”
Heal All, Prunella vulgaris, is native to North America occurring in all 50 of the United States and most of the provinces of Canada. It’s a member of the Mint family, Lamiaceae.
A voluntary weed called Self-Heal appeared at the edge of a driveway.
Another common name for heal all is common self-heal which suggests
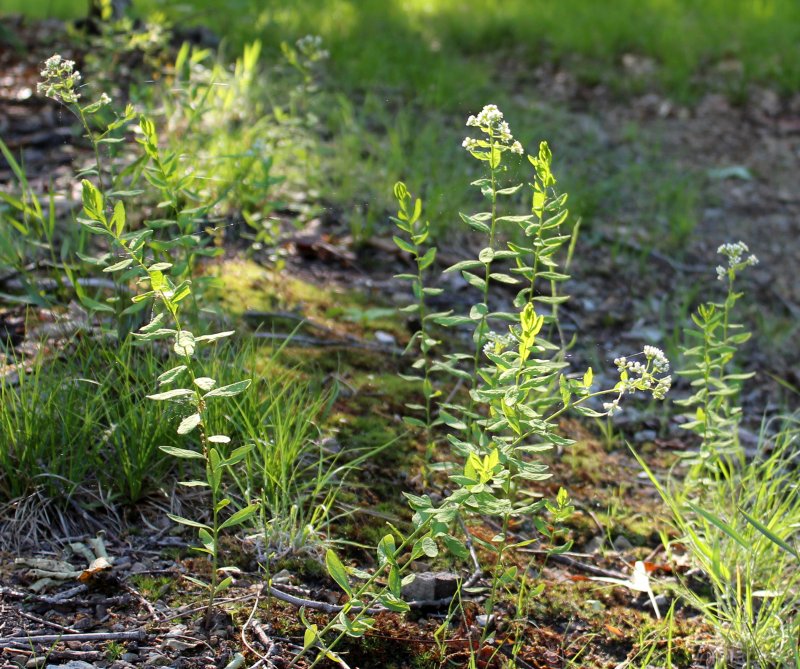
Star Toadflax, also known as Bastard Toadflax, is flowering in the woods here in south central Pennsylvania.
It’s a semi-parasitic plant native to all of North America, even Canada and Alaska. Hawaii, Louisiana and Florida are the only U. S. states that don’t reportComandra umbellata as being present. Star toadflax is a member of the Sandalwood family, Santalaceae.
Bastard Toadflax Flowering at the Edge of the Woods
Here’s something I hadn’t known about this little plant
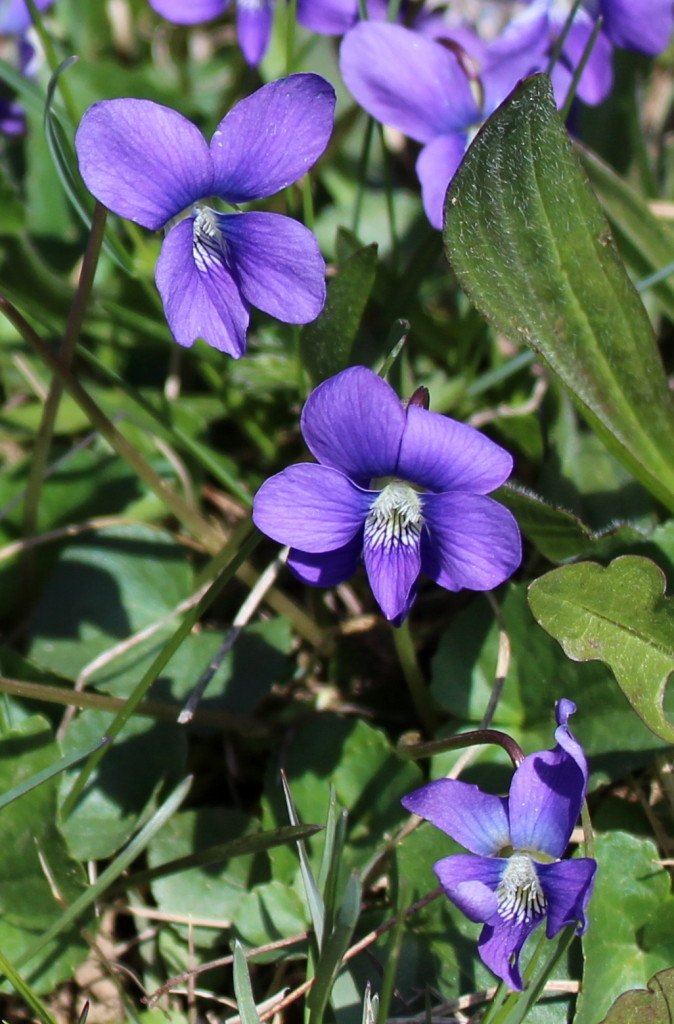
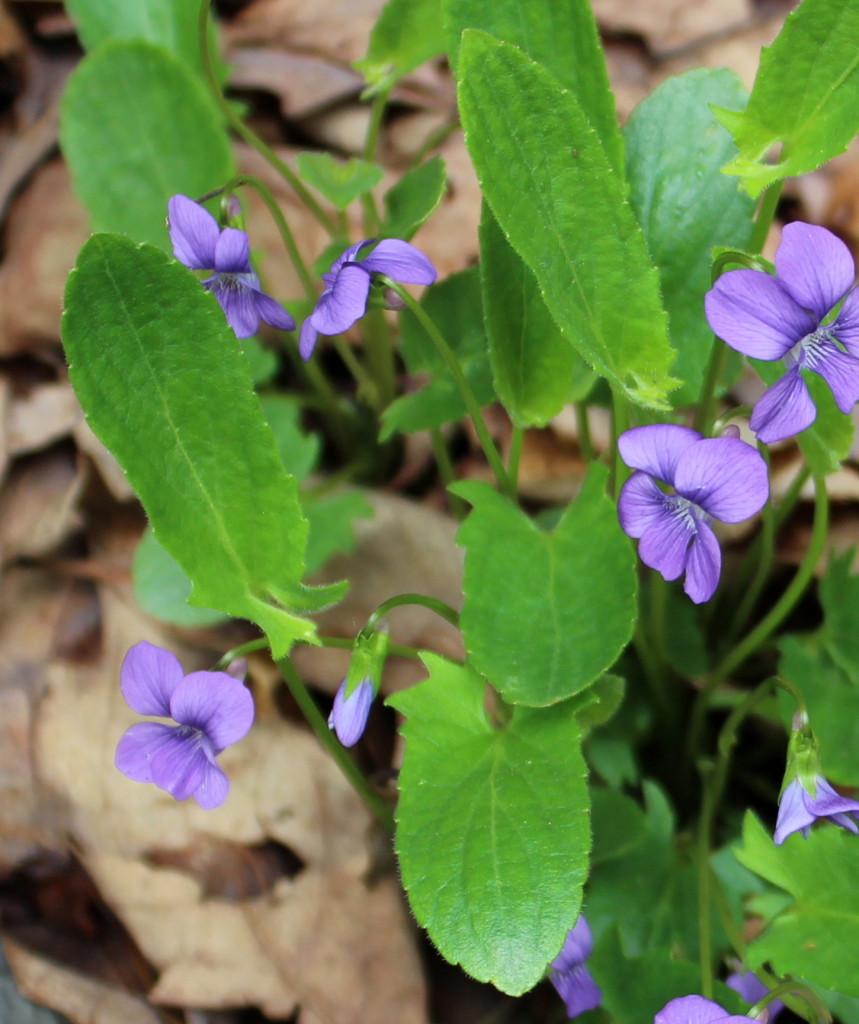
Northern downy violets and common blue violets were very pretty for the last month. At our location in south-central Pennsylvania the common violet comes into full bloom about a week after the northern violets are peaking in their abundance.
Downy northern violet starts blooming here during the last week of April. As a community they bloom for at least a couple of weeks with new flowers springing up in between the long scalloped leaves of any given plant. Violet plants that receive only morning sun started blooming later than those in the open yard, so our entire blooming season for these pretty purple violets lasts about a month.
Downy leaves of the downy northern violet.Common blue violet in the lawn.
The easiest way to tell the difference between downy northern violet and the common blue violet is to look at their leaves. The downy northern has elongated leaves with scalloped edges and spurs on each side at the base of each leaf. The first leaves of the season are shorter and somewhat rounded and they may be confused with the common blue violet leaves which are heart-shaped leaves with scalloped edges.
Elongated downy northern violet leaves.Common blue violet with heart-shaped leaves.
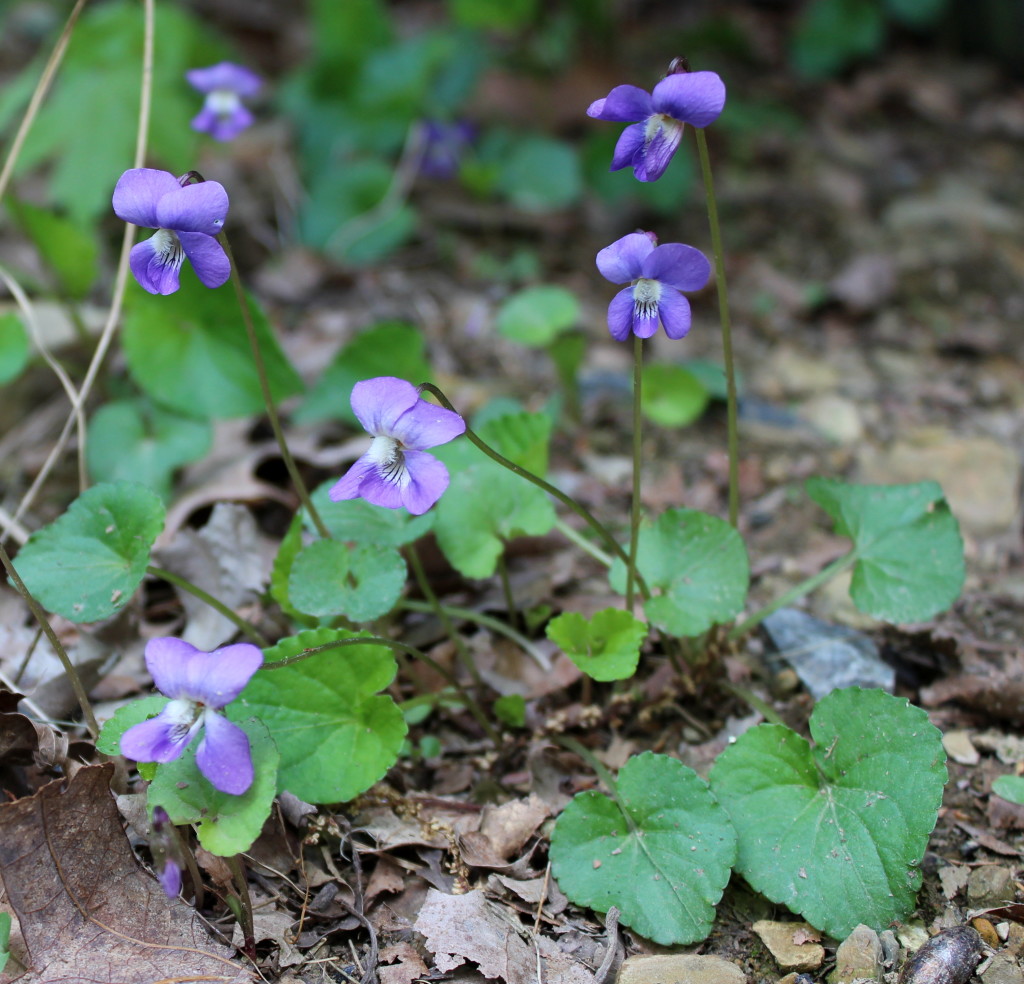
We appeared to have lost the only two examples of arrow-leaved violets this winter. These plants were different than the much more plentiful common blue and downy northern violets. The leaves were large and the whole plant noticeable from a distance merely due to its size, as compared to the diminutive downy northern violets. The blooms weren’t much different as I remember, but the leaves were more wedge-shaped than the upright and narrow leaves of the downy northern violet.
Arrow-leaved violet.
We decided to hold off on making violet jelly this year. We still have one jar and plenty of other jellies in the pantry, so as Momma would say, “Waste not, want not!” We’ll save the sugar for making blackberry jelly or maybe elderberry jelly in 2 or 3 months.
A few weeks ago I came across a bookmark for a violet jelly recipe. Last year I marked the recipe page as the violets had already bloomed for the year when I first saw the recipe. I knew that Viola sp. were edible and had already put a few blossoms on top of a salad or on a plate or drink just to snaz things up a bit. The colorful blossoms don’t seem to have much of a taste and that made me curious about violet jelly.
As serendipity would have it, a ton of native violets grow wild on our property. At the time I was reading about making jelly from violets our Northern Downy Violets were in full bloom, so we made a batch of violet jelly! Oddly, I thought it would taste like grapes, because of the cool colors I guess. The real taste is floral – like a violet and slightly fruity or berry-like with a faint hint of elderberry. Elderberry jelly has a much, much stronger flavor, but there were notes of it in our violet jelly.
Three of us went outside on a sunny and breezy day in April to pick two cups of violet flowers. Just the flower heads were needed so any stems that came off the plant were picked out of the bowl. Violet flowers were picked from our backyard on the mountain ridge top.
Violet pickers happily picking flowers for jelly. Photo taken 20 April 2012.
In about 15 minutes time we had the amount of violets we needed to make the jelly. Nearly three cups of violets were loosely tossed into a measuring bowl and the whole amount was firmly packed in a 2-cup glass measuring cup. Now, that’s not firmly packed like brown sugar measured out for a batch of cookies, but the flowers were pressed down lightly to fit in the measuring cup.
Three cups of loosely packed violet flowers.Two cups of violet flowers in a glass measuring cup.
The violets appeared rather clean, but since the pollen has been very high lately they were given a quick rinse with water in a colander anyway.
Violets were rinsed with water running through a colander.
The next step for making the violet jelly was to pour two cups of boiling water on top of the flowers. We want two cups of liquid to make the jelly, so don’t rely on using the measuring cup scale for adding two cups of water. Since the violets already took up space in the measuring cup, boiling water was measured out in a separate measuring cup and then poured on top of the flowers.
Two cups of violet flowers after two cups of boiling water was poured on them.
After a couple of hours steeping the deep blue liquid could be decanted off the flowers. We let the measuring cup sit at room temperature for a couple of hours so we could see the color develop and then let it sit in the refrigerator overnight. After 24 hours of total steeping time, a double layer of cheesecloth was draped over a 2 quart bowl and the flower and water mixture was poured over the cheesecloth. The flowers were held back from the liquid and then taken to the compost pile.
Ingredients for making violet jelly, including from the top, clockwise: 3 oz. packet liquid pectin Certo brand, 2 cups violet juice, 1/4 cup lemon juice, and 4 cups sugar.
At this point the violet liquid was a very deep blue color. Four cups of sugar were measured out into a separate bowl. A 3 oz. package of liquid pectin, Certo brand, was opened and sat upright in a glass. A quarter cup of lemon juice was measured out too so that all ingredients were ready when needed. Previously, about an hour before, glass jars were washed and sterilized in the dishwasher and the door kept closed so that the jars would stay hot until needed. Bands and lids were sterilized with a kettle of boiling water poured over them as laid out in a skillet and covered with a lid until needed.
Take caution! To cook up the jelly use a 4 quart pan. When we made this particular batch of jelly we used a 2 quart pan to cook the jelly and created one heck of a mess. As the jelly cooks to a boil foam is formed and that foam layer rises a couple of inches up from the liquid level in the pan. Needless to say there was a scorched mess on the stove top to clean up because the hot jelly ran over. I just knew that pan looked a little full at the time, but I neglected my own thoughts and decided to follow the recipe to a T. Wish I had listened to myself, but since I didn’t, maybe you won’t make the same mistake.
At this point in making the jelly we should have transferred the blue liquid to a 4 quart pan before turning on the heat. The heat was set to high and the mixture was constantly stirred. The lemon juice was added and the color changed immediately from deep blue to a light lavender or pink color.
Lemon juice added to the violet juice turned the deep blue color to pink.
Sugar was added to the pan and the heating continued. It didn’t take too long to bring the mixture to a boil and it was constantly stirred.
After sugar was added to the violet and lemon juices, the mixture was an opaque pink color that cleared upon boiling.
Once the boil was reached, the packet of liquid pectin was added and the mixture boiled for two minutes more. With the smaller pan we had to guess at how long the pectin-sugar-juice mixture was actually boiled because the pan was taken off the heat to stop the boiling over. We guessed ok because the jelly gelled just fine.
Jars of Violet Jelly made from Northern Downy Violets. 21 April 2012.
Evidently, the same jelly recipe could be used for other floral jellies, like rose or rose hips jelly, or herb jellies, like mint or lemon thyme jelly. It would be fun to try some other fine jellies like that, but if we find another big violet patch, we’ll be making some more violet jelly first.