Blooming Box Huckleberries in the Tuscarora State Forest

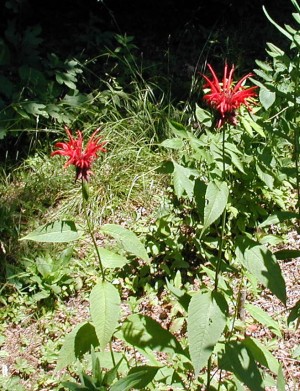
The morning of April 3, 2010 was a beautifully sunny one. We drove straight through Newport via the River Road where we saw some beautiful stands of Dutchman’s Breeches and they were flowering just profusely. They are really pretty with their little flower frond held high in the air. They made me stop and turn around they were that pretty. Since it was private property we didn’t take time to ask to get a picture because we were on the way somewhere.

Anyway, we continued on through Newport, PA on Route 34 south to New Bloomfield, turned left at the town square and continued on Route 274. About where the houses end at the edge of town, we turned right onto Huckleberry Road and about a half-mile down the road came to the Box Huckleberry Natural Area, land protected by the forest service.

The Box Huckleberry Natural Area is a 10-acre site in the Tuscarora State Forest.

Sign at the entrance of the Box Huckleberry Natural Area

The Box Huckleberry Natural Area of the Tuscarora State Forest has been managed by the Pennsylvania Bureau of Forestry since 1974, and is located in Perry County, Pennsylvania. Route 34/274 are half a mile away and New Bloomfield is 1 1/2 miles away. Take the Newport/Route 34 exit of Route 322 and continue south on Route 34. When you turn onto Huckleberry Road there is a small pullout for a parking area. The creek across the road feeds into Trout Run.

Entrance to the Box Huckleberry Natural Area
Steps at the entrance to the Box Huckleberry Natural Area

Walking up the steps into the natural area you come to a trail where there is a map posted. No pamphlets available. Rules and regulations are posted by the Forest Service. To be highlighted among these rules is that you shall do no picking of flowers according to the rules on forest products.

Map of the 10-acre Box Huckleberry Natural Area

The trail is well-worn with pine needles, pine cones, leaves or moss covering the trail in places. It’s a short trail running maybe half a mile up and over a hill. In a few spots you could see the tire imprints of a mountain bike rider that rode through the trail recently.

Well-worn trail of the Box Huckleberry Natural Area

The nature trail has a moderate climb and a few steps in appropriate locations to help you up the trail.

Going up the trail at the Box Huckleberry Natural Area

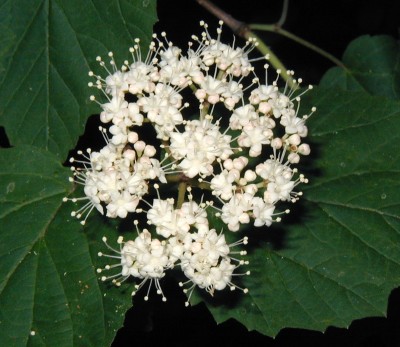
The Box Huckleberry, Gaylussacia brachycera, is like a low-growing blueberry. The plants are green everywhere with their evergreen leaves shining in the sunlight.

Shining leaves of the box huckleberry carpet the area.
Box huckleberry by the trail.

Small oval leaves are leathery to the touch, with a shiny slick upper surface and a paler rougher surface on the underside of the leaves.

Close-up image of the box huckleberry leaf underside and blooms.
Close-up image of the box huckleberry leaf underside and a few blooms.

Huckleberry blossoms are just starting to come out now. The flowers are similar to blueberry blossoms because the bell-shaped white flowers hang in clusters.

The dangling flowers of the box huckleberry.
Dangling flowers of the box huckleberry.
Group of flowering box huckleberries.
Pink flower buds of the box huckleberry.

Most plants have tight pink buds for flowers, not opened blossoms. Blossoms that catch an early morning sun might be opening, but not very many huckleberries are blooming just yet.

Flower buds of the box huckleberry.
Close-up image of box huckleberry flower buds.
Box huckleberry blooms getting ready to open.

I came over here to find a trailing arbutus as I had never seen the “mayflower” before and it’s been reported to be at this location. Trailing arbutus, Epigaea repens, has rounded evergreen leaves and five pointed bell-shaped blossoms in pink or white. I combed the area in and around the pine trees trying to find trailing arbutus but with no luck.

A couple groups of striped wintergreen were close to the trail in the shaded areas, especially on the hillsides. This land is pretty much covered with white pine and hemlock which creates deep shade and the perfect type of area for the box huckleberry.

Box huckleberry has not spread to areas underneath the more open canopy of the deciduous trees on the far side of the hill. The areas with more sun reaching the ground, like the far side of the hill from the entrance, might be the natural limit of the huckleberry due to the lack of shade.

I found it interesting that the only known colony or plant in North Carolina is associated with mountain laurel, just as the PA plants are.

Besides the striped wintergreen we saw the single leaf of the dogtooth violet but no blooms, and wintergreen – some still with their red berries. Where the box huckleberry grows almost nothing else is growing as it heavily carpets the whole area. Rattlesnake-weed with its heavy, purple-veined leaf ribs were seen at the edge of the shady area near the entrance.

Box Huckleberry Natural Area Reference

A major curiosity is that the entire box huckleberry colony is actually one giant plant that is estimated to be at least 1300 years old! It grows by expansion of roots at a rate of about 6 inches per year. Currently, the New Bloomfield Box Huckleberry, as it’s referred to by the forest service, is about 8 acres in size. There’s another box huckleberry plant not too far from here that is reportedly over 13,000 years old, which makes these plants some of the very oldest organisms on the planet.

Worthy of protection, don’t you think? The box huckleberry has a threatened status in Pennsylvania and is protected by virtue of being in the State Forest.

Under Title 17 Pennsylvania Code, Part 1 Department of Conservation and Natural Resources, Subpart C State Forests, Chapter 21 General Provisions, under Forest Products part 21.31 Prohibitions. The following activities are prohibited…

Cutting, picking, digging, damaging or removing in whole or in part a living or dead plant, vine, shrub, tree or flower on State Forest land without written permission of the district forester or designee, except that edible wild plants or plant parts may be gathered without authorization if they are gathered for one’s own personal or family consumption. Dead and down wood for small camp fires may be gathered without prior authorization.

I would interpret that to mean that we can’t take any clippings or cuttings of the plants themselves, but we could come back and sample the fruit without getting in trouble. I wonder if huckleberries taste like blueberries…hmmm, maybe we’ll come back to this berry patch in June.

Reblog this post [with Zemanta]

Bee Balm Blooming Bright Red

The bright red blooms of Bee Balm, Monarda didyma, also known as Oswego Tea, can be seen from a distance. The red color is truly a bright red – it surely attracts hummingbirds and butterflies.

Bee Balm or Oswego Tea in bloom.

Bee balm or Oswego tea in bloom.

Several tubular flowers open on bee balm.

Several irregularly-shaped, tubular flowers open at a time.

Maroon bracts just below the bee balm flowers.

The bracts just below the rounded head of flowers are also red, but more on the maroon side of red.

A friend found a few plants growing near the Juniata River and gave us a couple for our native plant gardens. To match it’s native habitat I’ll be transplanting ours along the lane near the spring that runs after a good rain.

Once they’re established I’d like to harvest the leaves to try the tea. Does anyone here use bee balm as oswego tea?

Fresh Strawberries and Flowering Viburnum

I’m happy to report that the first Ozark Beauty strawberries were eaten this week. We started with six plants last summer and since they had to adjust to their new surroundings they didn’t put out runners, so we still have six plants. Flowering started four weeks ago. The nice thing about this variety is that they’re an everlasting type, meaning that they will bloom and produce fruit two or three times in a growing season, not just once.

You can’t get a fresher taste of strawberries than picking them fresh!

This time of year is very pretty in the woodlands. Violets have been flowering for a month and now the blackberry shrubs are in full color. Ok, they’re not exactly colorful as the blossoms are all white, but they do give a splash of color in the otherwise green and brown landscape.

The Solomon’s Seal and False Solomon’s Seal are blooming all over the woods. Perhaps the wet, cool weather has been the best weather for the forest flowers. I haven’t seen this many blooming forest-dwellers in previous years. The ones putting on the biggest show are the Maple-leaved Viburnum. Everywhere you turn the fuzzy-looking flower clusters are shining white. Stamens project up and out so the clusters of flowers look fuzzy from a distance.

Maple-leaved viburnum flowering in the woodlands.

Maple-leaved viburnum flowering in the woodlands.

White stamens project above the white petals of viburnum.

White stamens project above the white petals of viburnum. Unopened flowers have a tinge of pink.

Also blooming now are deerberry, bastard toadflax, dame’s rocket, common violets, and a host of planted flowers in the garden, like pansies, dahlias, marigolds, johnny jump-ups, false blue indigo and irises.

White Raspberries, An Everlasting Variety

Early this afternoon we dug up several white raspberries from a neighbor’s patch. The plants were going to be mowed down and we were lucky enough to know about this ahead of time. Since we’d been having lots of rain for the past week or so, the digging went fairly easy. Plants that we pulled out of the ground were placed in plastic grocery bags for easy handling and containment of loose dirt.

We planted the raspberries in three different places. The first area was a spot on the southwest side of the farmer’s lane in a partially open spot in the woods where the plants will get sun at mid-day and filtered sun for the rest of the day. This spot has several wild blackberries and elderberries so it seemed a likely place to dig in some raspberry canes. The second place was at the edge of the woods in the back yard and these plants will get late morning to early afternoon sun. The third spot was at the edge of the woods on the east side of the backyard and these plants will get sunlight from about noon to late afternoon. By planting in several locations we’re ensuring that at least some of the plants will grow to provide fruit.

Each raspberry plant had stiff canes from last year and some even had their flower buds developing on new growth. It will be interesting to note whether the flowers will continue to develop. Since they were dug up and re-planted within a few hours, perhaps they were not stressed too badly. It’s supposed to rain again tonight so the raspberries will be watered well.

The everlasting varieties of raspberry will bloom and set fruit more than once a year. In the fall all the canes will be cut down and fruit will arise the next year on the new year’s growth.

Now that we have about two dozen new raspberry plants, it will be interesting to see how they develop…and, eventually, how they taste!

New Garden Soil for Earth Day

Did you have a Happy Earth Day? We sure did, even if my knees kept me awake last night! We celebrated Earth Day by doing something nice for the piece of Earth that will sustain us this summer with fresh vegetables.

It had rained the previous couple nights and that made for easy digging and removal of weeds that were let go too long last year. The twisty tool with four pointed tips makes quick work of pulling up dandelions and other weeds. Got most of the garden weeded and cleaned up for planting.

We had a couple tons of topsoil delivered and had it dumped in a corner of the garden. We didn’t skimp on the quality of soil and opted for the Premium #1 grade mix of topsoil, compost and mushroom soil. Nicely screened of stones, too. Couldn’t be happier with the selection.

New garden dirt for Earth Day.

The natural clay and stone we call “dirt” will be tilled up in parts of the garden that either have nothing growing or tightly packed soil. It’s taken 3-4 years to get the garden soil in the shape it’s in now, but it sure could use more organics.

Some places the garlic and lettuce are already growing and we’ll just let those be as they are.

April Showers and Cherry Trees Flower

Well, now that the showers of April are soaking the mountains of Pennsylvania we can look forward to more trees blooming. So far, the brilliant red flowers and leaf buds of the maples have joined in with the yellow green willow leaves to announce that the growing season is upon us.

Grass is greener now and an abundance of Spring bulbs are showing their happy faces everywhere. First the snowdrops appeared with their bowed heads as if to say they’d rather still be slumbering. Crocuses were the next earliest in appearance sporting their deep purples, bright whites and glowing yellow flowers. Grape hyacinth are dainty little bulbs, and the flower color is such a deep hue of purple. These little blooms last for a week or more and appear in early Spring along with the snowdrops. Daffodils and narcissus come along next and they’re still blooming as we wait for the storm to pass over us. Hyacinths smell so sweet, and it’s too bad that they’re fast bloomers. They don’t stick around for very long, so I always cut one to freshen a room indoors with the scent of their bloom. Tulip buds are just now starting to stretch high enough so their big-petaled flowers can open.

The last couple days we saw the forsythia plant open its pretty yellow blooms and yesterday they were fully open. Since most of the trees aren’t yet showing green leaves and the landscape is fairly drab, the yellow of the forsythia really draws one’s eye.

Yesterday, we noted that the Northern Downy Violets were blooming in larger numbers than the previous two days. You have to look close to see them as they stand only a couple inches high. The natural smattering of little flowers all over the lawn and near the lane always makes me smile.

Scanning across the woods at the edges of fields you can see native cherry trees in bloom, which will last less than a week especially with rain forecasted for the next three days. In the towns nearby one can see the ornamental pears showing off their white blooms and a few tulip trees starting to open their hot pink and white blossoms.

Did I forget to mention the dandelions? Yup! Their yellow blossoms are fairly closed up today with the rain and lack of sun, but yesterday a million yellow heads were beaming, “It’s Spring!”

A few other plants stirring to life are the comfrey herb, the blueberry bushes, blue columbine, echinacea, moss peony, lilac, redbud, raspberries, elderberries, strawberries, and no doubt a bunch more, including lettuce, garlic and savory in the vegetable garden.

Making Homemade Ketchup in the Outdoor Kitchen

A fun couple days in the outdoor kitchen this summer happened when we made a batch of ketchup. Homemade ketchup! Ever hear of it? Me neither.

Although we call it ketchup, it’s nothing like the store bought sugary sweet condiment that we’ve all had on a burger or dipped our fries into. Our Country Ketchup is more like a really flavorful tomato paste, but in a pourable consistency. It’s really good on a sandwich, on pasta or potatoes, or as the tomato base for many a recipe.

We started with a bushel of tomatoes and laid those on a table outdoors to let them fully ripen. A couple pounds of Hungarian peppers and a couple of pounds of red bell peppers were laid on the table also. After 4 or 5 days of sun-ripening the two-day cooking of the ketchup could commence.

In the outdoor kitchen we had a propane burner with a 30 pound tank providing all the fuel we needed for all the canning and preserving for the whole summer.

A large granite pot was used to cook down the vegetables. Each tomato was sliced in half, or in quarters if it was a large one, and dropped into a blender. We didn’t take any pains to remove the tomato skin or the seeds. Everything went into the pot. When the blender was about half full it was poured into the big pot.

Peppers were treated the same way, except the inner parts and seeds of the peppers were thrown out and not put in the pot.

I found out about not touching your face or rubbing your eyes after handling Hungarian peppers. Even after I had washed my hands there was still significant “hot stuff” on my hands to cause essential blindness for about 15 minutes. I had rubbed my eyes after washing my hands and wow! The burning was so intense and my eyes watered so badly that I couldn’t see! I just kept them closed because opening them wasn’t possible. The air seemed to make them burn even more. After splashing water on my face, and getting it everywhere, I could still feel the burning but it was diminishing. When I could finally keep my eyes open I saw my face was beet red. A glass of green tea made me feel better, but I learned a good lesson about handling super hot peppers.

We used the Hungarian peppers, red bell peppers, banana peppers and sweet frying peppers in the ketchup. Our tomato selection included a couple varieties of the big slicing type and a lot of Roma tomatoes. Vidalia onions were added to the mix near the end of the cooking, on the second day.

For added flavor we put pickling spices and about 10 green sassafras leaves in a cheesecloth bag that was allowed to hang in the pot during cooking. I tied a piece of twine around the cheesecloth to make a sort of bag. A long length of twine was left so that it could hang over the side of the pot.

A couple cups of sugar and vinegar were added after the soup cooked down for a whole day. We still sliced veggies, blended and poured the veggie juice into the pot and the pot was stirred. Cooking down a bushel of tomatoes and a peck of peppers took a while to say the least. When we got into doing this little project I wasn’t aware that it was a two-day process to make homemade ketchup!

Since the pot was cooking for a day before we added the sugar I’m not sure how far into the recipe we got before we added the sugar. Let’s just say that we were 3/4 done with adding the veggies. Once the sugar was added, we had to be careful to keep stirring the pot or else the sticky sauce would burn on the bottom of the pot.

Taste-testing commenced after the sugar and vinegar were added and allowed to simmer for a while. Too sweet? Add more vinegar.

We bottled the homemade ketchup in Grölsch beer bottles that had been run through a light cycle in the dishwasher. The ceramic cap provides a great seal that can be opened and resealed. The ketchup bottles can be stored at room temperature until they’re opened.

The guy at the wine store sold us a case of the empty Grölsch bottles at a dollar each. If purchased individually, they would have been $1.25 each. I say go buy the beer and enjoy drinking it first. Ah…memories of Amsterdam!

A ladle and funnel were put to good use filling each beer bottle with our delicious ketchup. After each bottle was filled while the ketchup was still hot, the cap was pushed on to seal each bottle.

Doubt the case of ketchup will last a year as it’s so versatile – it goes with everything!

Have you made homemade ketchup? Or is it catsup? Leave a comment and tell us about your outdoor cooking adventures!

Sassafras Tea: An Autumn Treat From the Edge of the Woods

It’s not just the leaves of Sassafras that I enjoy – I’ve always loved this plant.

I remember attending a Scouting function with my family when I was a young teenager. It must have been in the Autumn as I can clearly remember that it was a chilly day.

Reviewing the different booths that the scouts had set up to show their newly learned skills, like a model showing how water erodes hillsides and what that means for trail-blazing, or the knot-tying skills they used to build the cool rope bridge outdoors, I came upon a table where Sassafras tea was offered.

Of course I said I would try a cup of hot tea. After all, it was chilly out there. One sip and I fell in love with the taste of Sassafras tea. It was just like the way the leaves smelled when you crushed them. How delightful! I must have gone back to that booth two more times for more tea.

For a long time after that day I hadn’t seen or tasted sassafras tea. I wondered why I never saw it offered for sale in the stores. I do remember finding some long stick candy that was sassafras flavored, but that was years ago.

It turns out a compound in Sassafras, called safrole, was found to be carcinogenic, and that’s exactly why we don’t see sassafras on store shelves. However, it’s debatable whether Sassafras is more carcinogenic than alcohol. Knowing that most things are ok in moderation, we don’t worry about getting cancer from a cup of Sassafras tea every now and then.

To make Sassafras tea you’ll need to get the roots. Loosen the soil around a small tree to make it easier to pull it up to get the roots. Shake off any excess dirt from the roots and give them a rinse before putting into a pot of water.

Boiling sassafras roots.

Boiling sassafras roots for tea.

Cup of sassafras tea.

A cup of sassafras tea.

If you can get enough roots to save some for later, you’ll need to let the roots dry, then store them in a glass container. The root bark is especially strong with Sassafras essential oil. Just don’t store the roots too long, as the essential oils will dissipate over time leaving your colorful tea pretty much tasting like a dried out tree root.

Boil the roots until the water has turned an amber red color. Drain off the tea and sweeten as you like. Sassafras tea with honey is just delicious!